Pages

Thursday, May 27, 2010

my creative space: kozo tape

I am just loving this awesome Kozo tape that my friend brought me back from Japan. I had a few pressies to wrap the other day and it was heaps of fun to use and so quick to decorate with.


Today I am thinking about making some sort of an art work with it so I'm going to plan out a few ideas.
If you aren't lucky enough to have a pal in Japan you can buy it here http://emporium.katydid.co.nz/category/wrapping,
here http://www.presse.co.nz/paper-supplies 
or here http://www.etsy.com/shop/PrettyTape
 I am feeling the need to add to my supplies- there are so many gorgeous ones to choose from!

To see what's happening in other creative spaces today head over to Kirsty's here
Megan x

Tuesday, May 25, 2010

a bag and a bib for a baby boy


Been a bit quiet on the blog this week! I had a fun night in Auckland on Saturday taking Amelie to Disney on Ice. She was very excited and watching her quite gobsmacked by the whole thing was very entertaining. It was a great show :)

On the crafting front I made my first baby bib the other day. My friend Ange asked me to make one of my personalised kids toilet bags for a friends one year old baby boy and I had just enough fabric left over to make a bib too. I am really enjoying using bias binding- it looks so professional! I didn't even pin it on- I just pulled it around the edges as I sewed. I went through quite a few fasteners trying to attach them to the bib- I think I was hitting them a bit too hard with the hammer!
Megan x

Friday, May 21, 2010

and the 'SewMamaSew giveaway day' winner is...

 Catherine from A Time to Create. Congratulations Catherine! An email is on its way to get your details :)

Thank you so much everyone for  your lovely comments and for following my blog or my mousehouse facebook page - I was really amazed by all the entries!

Have a great weekend-  me and Amelie are off to Disney on Ice tomorrow- can't wait!
Megan x

Thursday, May 20, 2010

my creative space: a crafty morning and a little dress

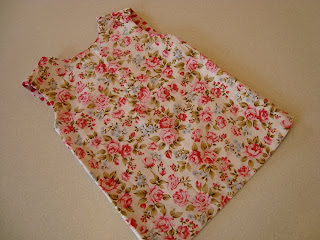
If you read 'Your Home and Garden' magazine you might recognise this lounge...this is where I got to spend the morning yesterday learning how to use a pattern to make a little dress.
My friend Anna's house is in the latest issue (June) and it is the most gorgeous home.
I went up yesterday morning with Stella- Anna had the fire going, choccy chip biscuits and coffee and took me through how to make this lovely little dress. I cut out the pieces yesterday afternoon and sewed it together last night and I just love it. The gathering was a bit tricky as my threads kept breaking but luckily Anna said to sew two lines of stitching for the gathering so at least I had one thread to use when the other one broke! I got the cute fabric for an absolute bargain- it was $4 a metre special at Arthur Toyes a while ago. Good to practice on! It looks pretty summery but with a merino top underneath, a cardi and some stockings it will be good for winter too.
Anna made this dress from the same pattern - she is really creative with the little touches like the ribbon along the bottom and the applique heart on the back.
Looking forward to going pattern shopping and seeing what else I can make now.

And on the subject of people I know in magazines at the mo... my sister is in the latest M2 magazine! She wrote an article about Karen Murrell organic skincare and cosmetics and her photo is on the contributors page. I took the photo by putting my marimekko canvas behind her to match her red lippie :)

To see what's happening in other creative spaces today head over to Kirsty's here
Megan x

Tuesday, May 18, 2010

Ink Apples Oven Mitt

I made my first oven mitt in the weekend for a friend Kelli who put in a request for one after seeing my ink apples fabric. I was a bit nervous about making this as it needed a lot of binding and I have never used bias binding before! Whenever I mentioned bias binding to people they would give me that look and tell me it was a bit tricky so I was feeling pretty apprehensive before starting!
I found a pattern and instructions in Cath Kidston's 'Sew!" book so off I went to Bernina to get all my supplies.
They have a product called Insul-Bright which is an insulated lining for oven mitts, tea cozies etc so I used that. I bought some 10mm bias binding but with all the layers of the mitt it wasn't really wide enough for a novice like me so I went back and got the 25mm instead.  One of the ladies at Bernina gave me some good advice which was to zigzag around the whole mitt before binding it so the layers would be nice and flat to bind. I also used the zigzag stitch to attach the binding to the mitt. It's not perfect at all but I am happy with it for a first go, and Kelli was rapt with it so thats good! I was a bit worried that I should have put some cotton batting in the mitt as well but Kelli used it last night and said it worked a treat so that's a relief!
I bought a tea towel from Briscoes and added a strip of the apples fabric to match the mitt. I got the idea for that from another Kelly- she put a tutorial on her blog here.
Here's a pic of them in Kelli's kitchen :) She is really getting into all the crafty blogs out there and even talking about doing some sewing- go Kelli!
Now I just want to go buy heaps of binding and make some oven gloves and maybe even some baby bibs to practice my binding. My little one Stella has an ear infection though so my sewing time might be a bit limited- she's asleep now though after being up till midnight last night on and off, oh well at least she slept 6 hours last night!
Megan x

Sunday, May 16, 2010

Sew Mama Sew Giveaway now closed!

20/5/10. Thank you everyone for your entries in my giveaway, for following my blog and liking my facebook page- I am blown away by how many entries there have been and the lovely comments from all over the world! Entries are now closed and I'll announce the winner tomorrow Friday-good luck! :)

Having seen this on some of my favourite blogs 'Reclaiming Me'Seaside Siblings and Mon Petit Poppet, I've signed up for the Sew Mama Giveaway Day happening all over blogland!
I'm giving away one of my medium -sized waterproof zip purses that I've called 'Sunshine Flower' (that's what my toddler calls sun flowers.) This size is great for a makeup bag, a childrens toilet bag, a pencil case or just a handy zip purse.


You get one entry for being a follower to my blog already, or by becoming a follower. Or if you don't have a blog you can enter by 'liking' my mousehouse page on facebook.  Just leave a comment here or on my Facebook page so I know you want to enter!
For a second entry you can blog or tweet about this giveaway- just leave a link to where you mentioned my giveaway :)
International entries welcome...you've got until the 20th May '10 to enter and I'll draw the winner on the 21st.
Good luck!
Megan x
Click here for loads more awesome giveaways

Thursday, May 13, 2010

my creative space: a lolly filled birthday card


In my creative space today is a sweet treat birthday card idea.  I wanted to make a fun, creative birthday card for Amelie's special friend Henry for his 3rd birthday this week and mulling over a few ideas in my head I came up with this idea for a yummy treat card. What 3 year old doesn't want a card filled with lollies!  Here's how I made it...it was actually quite easy!

You will need

  • 2 pieces of A4 card
  • mini zip lock bags (enough for each letter of the childs name) -I got mine from a dollar value shop but stationery shops should have them too
  • decorative sellotape or kozo tape
  • craft knife or little sharp scissors
  • cutting mat (or could use old magazine)
  • small lollies (I used jellybeans, mnm's and wine gums but the smaller the lollies the better - mini mnm's would be ideal)
1. Using Word or Pages (or another word processing programme you use), type up the front of the card. For the letters of the childs name use a wide block type font and change the style to Outline. I used Gill Sans Ultra Bold. Another good font is Optima Extra Black. If the childs name is long you could make the card landscape layout instead of portrait so you have more room for the letters.
2. Print out onto one of the pieces of card
3. Using the craft knife or scissors cut out the letters like this


4. Fill up how ever many mini zip lock bags you need with lollies. Don't overfill or they won't lie nice and flat under the card.


5. Tape the bags to the back of the card underneath each letter. Next time I do this when typing up the card I will move the letters in more from the edge of the card so I've got more room to tape the bags down.


6. Get your second piece of card and use your decorative tape to join the 2 pieces of card together to make one big A4 size treat filled birthday card!


Henry loves fire engines so I found a poem by famous New Zealand poet James K Baxter, "The Firemen" and glued it into the card. I found the poem in a book from my childhood "Poems to Read to Young New Zealanders" (unfortunately I think it's out of print now.)


And there you have it- just don't eat too many lollies while you're making it like I did!

(If you want to make a smaller greeting card you could just cut out a large first letter of their name on the front of the card and use a larger zip lock bag.)

To see what's happening in other creative spaces today head over to Kirsty's here
Megan x


Wednesday, May 12, 2010

a sweet little dress and a kids apron

I recently entered Kelly's awesome giveaway over on her blog "Reclaiming Me" and although I didn't win the big prize I did win a surprise prize which I got in the mail today...
For Stella, this absolutely lovely little dress - I love the gorgeous fabrics!
And for Amelie, this cute- as little kids apron- she wore it around last night filling up the pockets with her bit and pieces- very cute!
Thank you so much Kelly, you are very talented!
You can check out more of Kelly's clever sewing skills here http://elijahsmum.felt.co.nz/
Megan x
PS: I've made a 'mousehouse' page on Facebook if you want to check it out and 'like'- thanks heaps :)
http://www.facebook.com/pages/mousehouse/116300955073789

PPS:  Here's another pile of things off to the op-shop for yesterdays Toss out Tuesday over on Sew Funky. 

Monday, May 10, 2010

colour, print and pattern

Had a bit of a hard night last night thanks to Stella waking up at exactly the second I finally got to sleep and screaming blue murder for the second night in a row. I wouldn't really mind it it was the middle of the night because at least I would have had some sleep by then! Funny thing is she is really happy and content during the day and even in the early evening between dinner and bed which is normally her grouchy time so it's very strange! Teething probably, ha easy to blame that!
Anyway, moving right along, what do you think of these gorgeous fabrics? I met a lovely lady Jen last week who has started selling some fabric and ribbon on TradeMe, so I couldn't resits choosing a few for my stash. Can't wait to make a few goodies using them all.
The fabric in the top left pic is a lovely light-weight corduroy which I am going to attempt to make my first little baby dress with. Won't it look cute with that matching flower ribbon.
You can see more of Jen's fabric here...
And for more lovely colour and pattern, isn't this Greengate plate just beautiful? My friend Anna gave it to Amelie for her 3rd birthday- she is going to buy one piece of Greengate for Amelie every birthday to build up a special collection. Isn't that a lovely idea :)
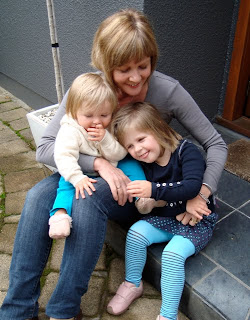
And here's a cute spots and stripes outfit Amelie got in the weekend from her Nana. I love the stripy stockings with the footprints on the feet! My mother in law Jan owns Hatched Boutique in Hamilton (which she conveniently opened when I was pregnant with Amelie!) so the girls get cute outfits from her lovely shop. Here is a pic of Jan with the girls on Mothers Day.
Finally, here's a link to a really neat website/blog "Print and Pattern"- fabric, wallpaper, stationery...love it!

Well, both girls are asleep now so that's good..wish me luck tonight!
Megan x
PS:had to republish this post as the first one was all over the place -blogger was not behaving itself!

Friday, May 7, 2010

Easy roast chicken and a chicken soup recipe with the leftovers


Something I really wanted to do this year was have meals that made great left overs the next night to make the early evenings a little easier with two kids!  'Cook once, eat twice' meals are great aren't they.
I'm not much of a cook but one thing I do like to cook is roast chicken, and the chicken soup makes a tasty quick meal for the following night.  So here's a recipe if you are a bit of a beginner cook like me!

Roast chicken and potatoes 
1. Turn oven on to 180
2. Rinse chicken under the tap and pat dry with a paper towel
3. Place in oven tray, peel 2 or 3 cloves of garlic and place in chicken cavity along with 2 lemon quarters.
4. Sprinkle tuscan seasoning and salt and pepper all over chicken
5. Place in oven, set timer for 30 mins

Prepare your potatoes- peel and chop into halves or quarters depending on size, place in bowl with enough olive oil to coat the potatoes, some chopped rosemary, a garlic clove and some red onion. Mix together in bowl.

6. At 30 mins, place potatoes around the chicken and set timer for another 30 mins.
7. When timer goes, turn the potatoes over and cook for a further 30 minutes.
Yummy on a cold winters night!

Ben's Chicken Soup recipe

1. Chop up your left over chicken into bite sized pieces
2. Bring one litre of chicken stock to the boil
3. Add vermicelli or spaghetti noodles (enough for however many people you are cooking for)
4. Boil for about 8-9 minutes
5. Add the chicken, a handful of peas and some chopped parsley and season with a good amount of pepper.
6. Serve with bread rolls

Another good 'cook once, eat twice' meal is to make spaghetti bolognese or a lasagne one night and then keep some of the mince aside and make baked potatoes with mince and cheese another night. Yum!
Would love any other ideas if you have them- thats about the limit of my cooking repertoire!!!
Megan x

Thursday, May 6, 2010

my creative space: a baby snuggle rug

Today I'm making a start on a snuggly baby blanket/floor rug using this cute pink and red spotty fabric on the front and fur on the back.  I made one a few weeks ago for my cousin Vicki's baby shower and I really loved the result so I am going to make a few more.
Here's some pics of the snuggle rug I made for Vicki. 
I took the fabric up to show my crafty friend Anna before I started and she gave me the idea of putting some ribbon trim detail on the cotton side. She also found the beige colour ribbon in her stash- wasn't it the perfect match thanks Anna!  I used cotton batting between the two layers to make it nice and comfy. You would think it would be quite easy to sew three layers together but it ended up being a bit harder than I thought it would be- I think because the fur had a bit of stretch to it it was a little tricky to keep the layers together evenly when sewing. 
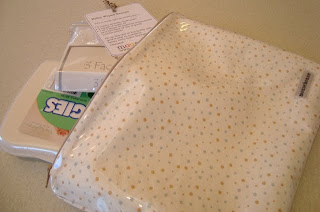
To go with the blanket I made one of my nappy wallets and put some wipes and flannels in and also a recipe for homemade baby wipes.
I've made up a few of these baby shower CD's in the past so I made one for Vicki as well with songs like "Waiting for that day", "Somebody to Love" "Good Morning Baby", "Never the Same" and "Welcome Home".
Right, time for some sewing now!
To see what's going on in other creative spaces today head over to Kirsty's here
Megan x

PS: there's a cute fabric giveaway over here...
http://everyspareminute.blogspot.com/2010/05/its-giveaway-time.html