Pages

Wednesday, December 15, 2010

photo gifts

I saw this fab idea on Angela's 'Striking Keys' blog where she took photo's of her little girl's favourite things and printed them out into an album....
I've had the idea bookmarked for ages now as I thought it would make a great Christmas present for Stella (21 months old). It can be a bit tricky buying for this age but one thing they really seem to love is seeing and naming their things and their family so I knew this would be a goodie for her. I just went around the house finding and photographing her favourite things and then used scrabble letters to spell out the words. I also put in some family photo's and things she really loves like the playhouse and the rocking horse.

I've never used an online printing service before but after seeing my sister's wedding thank- you cards I decided to go with Snapfish. It was great- the photo's were quick and easy to upload and I received my book within 4 days of ordering it! 
The other reason I went with Snapfish is that they had a great special on their photo gifts- 40% off photo books, calendars and greeting cards! So my book including shipping cost just over $18 for a 20 page soft cover book which I thought was pretty good. I just took a look and it looks like they have a 20% special now which is still something!  I also ordered a calendar for my mum and some Christmas cards as well.  
I'm going to make one up for Amelie now.  I'm doing her one a bit differently so can't wait to share that too!
I've been really slack with printing photo's this year- I haven't actually printed any all year so I have a big project on my hands going through my iphoto albums and choosing pics. I've been doing it by month to break it down a bit but I'm still only up to March of this year!!! I just keep thinking about all the stories I hear about people losing all their photo's because their computer broke down or was stolen so I really need to get some printed!
Hope you are all surviving the christmas rush and enjoying this hot weather ( if you've got it!)- it's 26 degrees here in Tauranga today!
Thanks for visiting, and thanks Angela for the great idea.
Megan x

Thursday, December 9, 2010

felt gingerbread houses

Last Christmas I came across this gorgeous gingerbread house decoration on the cool blog How about orange.  The house was designed by the very clever crafter and author Betz White.
So this year when I signed up for the kiwi christmas ornament swap I knew what I wanted to make straight away! I bought the e-book with the pattern and instructions for the house and five other cute ornaments from here- http://shop.craftypod.com/trimmings.
The instructions were really easy to follow and although they took a little bit of time to make up they were definitely worth it (and I got quicker the more I made as you do). I made the houses slightly bigger than the pattern. One little tip - if instructions say to use craft glue don't think that PVA will do- I had a disaster with my first one trying to use PVA!!
I made up these little bags for my fellow ornament swappers.
And for my little ones I made a house each with their initial on the door and added a bit of snow and sweets to the roof.
I've received some gorgeous ornaments in the swap too so far so will share them soon :)
Megan

Wednesday, December 8, 2010

DIY kids art for christmas


Here's a crafty idea I got from a teacher years ago using your child's hands and footprints to make a christmas reindeer picture. This is a great way to keep a record of their little hands and feet and something to bring out each christmas to see how much they have grown!

You'll need
*some craft paper or card or even plain red and brown paper/card.
(If you are doing this with older children like I did yesterday at school you could just use plain white paper and they colour in the foot and the hands themselves- keeps them busy yay!)
*scissors, glue stick, pencil, black marker

1. Trace around your child's hands and one foot ( just go around all their toes, not each toe- see pic below)
2. Cut out the two hands and the foot and then draw and cut out a nose and an eye like this.
3. Stick on a plain piece of card like this.
You could reduce this on a colour photocopier and make christmas cards or gift tags too!

Happy crafting!
Megan

Monday, December 6, 2010

some christmas goodies

We had a fun day up in Auckland yesterday, first going to Butterfly Creek for a 4th birthday treat for a special friend of Amelie's, then heading into the city to see Santa at Smith and Caughy's.
They always have the most amazing christmas window displays- this year's was a sort of christmas themed story of Cinderella.
I like buying a few christmas goodies for our home each year in Auckland but we just ran out of time for shopping this year!  I found these in a little gift shop in Tauranga the other day though. I bought these lovely t-lite candle holders and this super cute christmas nesting toy. 
And here's a pic of my last christmas stockings (for this christmas anyway!). I made these for a friend's two little girls.
I hope you are all enjoying the lead up to Christmas. I've got my last day at work tomorrow and then I'm going to have a whole lot more time for crafting and other things, well until April anyway!
Megan

Thursday, November 18, 2010

my creative space: christmas stockings and gift tags

Well, it's a busy day today with Amelie's swimming lesson, my 20 week scan, general kid wrangling and getting organised for a bonus day at work tomorrow, doing a day's relieving in one of the classes I teach in on a Tuesday.
Crafting wise, I'm working on two christmas stockings for a friend's two little girls at the moment and I've finished two as well- one for Amelie and one for a friends baby girl.
 
And if I get a chance I'm going to make some more christmas gift tags, including a few for my crafty christmas giveaway I'm having soon!
Visit Kirsty's at Kootoyoo for more creative spaces....I'm loving seeing all the creative christmas ideas out there in blogland!
Thanks for visiting!
Megan

Monday, November 15, 2010

ice ice baby

It was really hot here on Saturday so I got out the ice toy thingee I made up last week. It's so easy and the kids loved it.

Put some little plastic toys in an icecream container.
Fill the container with water, put the lid on and put in the freezer.
 
When frozen, pop the block of ice out and give to the kids to play with, either in or out of the water!
The girls loved seeing their toys in the ice and trying to get at them as the block slowly melted- it took ages too which is always good isn't it!

(If you have a dinosaur or an Ice Age fan, I've seen this idea used for birthday parties where the container is filled with little plastic dinosaurs and the kids get to break the block up to get at the dinosaurs!)

And in other news....you might have noticed I've been playing around with adding some pages to my blog - I'm meant to be doing my planning for work tomorrow and as usual am the worst procrastinator ever.  I've added pages for my crafty projects, my tutorials, kids stuff and my mousehouse things I've made for my (very neglected!) Felt Shop.

Thanks for visiting :)
Megan

Friday, November 12, 2010

ABC's in the garden

We've been spending a lot of time in the garden lately and one of the things I really wanted to do was a little garden bed for Amelie. We actually bought the raised bed last summer and it's just sat next to our vege garden all year looking very sad and empty!  Finally a few weekends ago we got some top soil and compost and filled it up ready for planting. It was neat planning with Amelie what she would like to plant and going off to the garden centre together.  She chose a pansy in her favourite colour, a cherry tomato,  two strawberry plants and some marigold seedlings.
I remembered seeing ages ago (in a gardening magazine I think) a grandmother that had spelt out her grandaughter' s name using flowers which I thought was such a neat idea.  So we used the marigolds to plant a letter A which she absolutely loves. Everyday for the last couple of weeks she has been out there checking on her 'A' and telling me how many flowers have 'popped' out.
You could use flowers to make little pictures in the garden too- like a love heart , a star  or a flower made of flowers!
Will have to try growing them from seed next- so far all I've managed is some cress!
Megan

Monday, November 8, 2010

a handmade christmas stocking

 I had a lovely crafty christmas morning on Saturday with a few friends. It was great enjoying a cuppa and some baking (kid free!!),  sharing ideas for some christmas crafts and getting started on a few projects. There was a cute top being made for a 7 year old using shirring elastic (which looked so easy I can't wait to give it a go), a lovely navy and white spot apron whipped up, and for me a start on a christmas stocking for Stella.  It was so nice hearing the sewing machines going and chatting away, definitely a lovely way to spend a morning!
I made this stocking out of cotton duck which I love the look of especially when it's been washed- it looks a bit like antique linen. I went for a bit of a vintage look to the stocking so the girls will hopefully keep them for ever- I still use my stocking that my mum's friend made us when we were little!
I used a pinky red gingham for the top, some lace trim and a lovely floral fabric for the star which was appliqued with the S. I lined the stocking and added some ric rac too. To make the stocking I just  used the same tutorial I've used before from Ruby in the Dust for a child's satchel bag but without the straps and a stocking shape instead!
Lots of fabrics and trims to choose from here...onto Amelie's next! 
And if you are looking for some christmas craft inspiration my crafty friend Rosie forwarded this link to me
Have a great week, thanks for visiting!
Megan

Thursday, October 28, 2010

my creative space: kids stuff

Today my creative space is all about kids stuff. I've been wanting to make some tin can phones for ages as my sister and I had so much fun playing with them when we were little. Last night I decorated two cans with kozo tape and attached the string- we tried them out today and they really do work! I love good old fashioned kids toys that have been around for ever :)

And the other day for the 5 year old class I teach in we made bubble blowers out of pipe cleaners -the kids had heaps of fun blowing and chasing bubbles. The pipe cleaners get pretty soggy but for a cheap and quick bubble blower that kids can make themselves they were great.
Ttoday I tried out making my own bubble mixture- I used this recipe and it worked well. 
  • half a cup of water
  • half a cup of dishwashing liquid
  • 6 drops of glycerin (I got this from the chemist- it was called Glycerol but apparently it's the same thing)
Stoked with this photo from the other day snapped mid bubble blow!

And I bought some Shrinky Dinks the other day for a rainy afternoon activity after seeing it on Cotton Kiwi's blog. Thanks Sarah for sharing these- I'd never heard of them before! It is this cool plastic paper stuff that you draw pictures on and then you cut them out and put them in the oven and they shrink and harden so you can use them for bag tags, jewellery and heaps more. Amelie loved seeing them shrink and shrivel up in the oven and then fold out flat. I just bought the refill pack instead of the pack with the drawings and you get quite a few sheets so it should last for a few more rainy afternoons yet. 
For loads more creative spaces visit Kirsty's here
Thanks for visiting!
Megan
PS: I am doing some seed growing with my 5 year old class next week- sowing seeds in yoghurt containers. Can anyone tell me what would be a good seed/plant to sow that comes up nice and quick? I was thinking of sunflowers or beans? or maybe cress or even grass would be quicker? Thanks!

Thursday, October 7, 2010

my creative space: a handy noticeboard tutorial

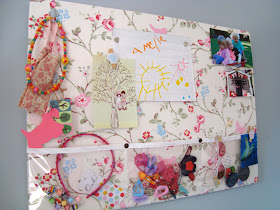
I've been wanting to make Amelie a noticeboard for her room for ages but I just couldn't find the right fabric to go with her blue walls..until I came across this lovely fabric called Cotton Bird Trail from Kate Fitzpatrick.  I wanted to make a noticeboard that also held all her bits and pieces that end up all over the house so I came up with the idea of adding a plastic pocket to the bottom of the noticeboard for all her hair clips, bobbles, headbands etc.   (I should add that they are still all over the house but at least they have a home now at the end of the day!) It actually didn't take much time at all- maybe an hour at the most so I thought I'd share it with you.
You'll need
* a piece of pinex cut to the size you want - I got it from ITM building supplies
* a piece of fabric big enough to cover the noticeboard
* a gun stapler
* some clear plastic (I get mine from Payless Plastics- you buy it off the roll- about $5 for half a metre)
* some bias binding

1. To work out how much fabric to cut, measure the width and length of your piece of pinex, then add about 5-10 cm to those measurements (depending on how thick your piece of pinex is- you want to cover the pinex including the sides with lots of room on the back to staple the fabric down easily) and cut out your fabric to those measurements.
2. Measure a piece of clear plastic the width of the piece of fabric and however much high you want it to be (mine was about 18 cm which includes some of the plastic going around the bottom of the noticeboard and stapled on the back- my pocket is about 15cm high finished)
3. Cut out your plastic and cut a piece of bias binding the width of the plastic
4. Sew the binding to the top of the plastic
 
5. Staple gun your fabric onto the piece of pinex
6. Place your plastic pocket on top of the fabric, fold it around the sides of the noticeboard and staple gun it to the back, sides and bottom of the noticeboard. 
A tip- when you staple the plastic let it have a bit of give instead of stapling it really tightly and flat to the noticeboard otherwise little fingers will find it tricky to get things out of the pocket! When I made mine I actually sewed three pockets into the plastic but I wouldn't do that again as it is quite tricky to get the things out of the pockets- it would be a lot easier if it was just one big pocket like in the tutorial.
7. I just stapled gunned a piece of string to the back to hang it but it isn't working very well so I'm going to get some little screws or something to attach the string to so the staples don't keep popping out when Amelie pulls on the noticeboard!
 
So there you have it- any questions just let me know! For more creative spaces head over to Kootoyoo.
Megan 
PS: Have you entered my facebook giveaway yet?
PPS: head on over to Sew Funky's blog to sign up for the kiwi christmas ornament swap!

Tuesday, September 28, 2010

gifts for girls

Well it has been the most beautiful couple of days here in the sunny BOP - after the equivalent of a year's worth of rain in the last six months it's about time we had some sun! Combined with daylight savings it's been lovely- we've had a morning at the beach, lots of time in the garden, a dinner outside and even got some washing dried on the line for a change! 

Anyway, I thought I'd share a few pics of some cute pressies for little girls I've bought or made lately...
I bought this gorgeous skirt for Miss 3 for christmas from the very clever Sarah from Cotton Kiwi via the Felt Aid shop. She is going to love it as her favourite things at the moment are playing dress ups and dancing (like a lot of 3 year olds girls!)
I made a personalised pillowcase and a toilet bag for a little girl's second birthday.
This is going to be a pencil case for a 6 year old girl- her mum took her to Bernina to choose her own fabric and zip as I didn't have any fabric in her favourite colour!
I couldn't resist buying this cute fairy finger puppet the other day for the girls. I found it at the teacher resource shop in Tauranga which is a really great shop (even for non-teachers!) Heaps of cute little things and reasonably priced too.
Well, here's hoping for another nice day tomorrow!
Megan x