Pages

Sunday, April 28, 2013

A Girly Girl Party: Activities and Food

Hi all, I hope you had a great weekend. Here's a little run through of the activities I did for the Girly Girl party, and some ideas for food as well.  First off I made up a little make-up table so each girl could get a bit of eye shadow, glitter and lip gloss. I also found these Hello Kitty body sprays at the supermarket so we pretended they were perfume which they all loved. I also bought a couple of coloured hair sprays from the chemist- a bright pink and a silver glitter one (also very popular!) 
While each girl was getting their make-up and hair colour, I put some colouring sheets on the table for them to do- these also doubled as placemats as I put a space for their names. I made these using clip art images from google. Here is a link to the pdf if you would like to use it  (for personal use as I just took the images from google!)
I am a big fan of a bit of colouring-in at the beginning of a party just while waiting for everyone to arrive and everyone getting used to being there- and you can make them to suit any theme.  I put a couple of plates with wafer biscuits, heart jellybeans and marshmellows for them to eat while colouring as I did a few activities before the main party food.
I just did two games for the party so once everyone had their make-up done we moved onto opening the presents, then Pass the Parcel, and a memory game. For pass the parcel I put a pink lollipop in each layer and then the final prize was this super cute Hello Kitty candy make-up compact and a Hello Kitty magic flannel. 

I saw the candy compacts in a google search in lots of UK and US online candy stores but I eventually found them online in NZ from this store...
I found the Hello Kitty flannels at Farmers.
The other game we did was this Memory game which I loved when I was little- I put 10 girly things on a tray and then the kids had about 30 seconds to look at everything on the tray, then I took it away and they had to write down everything they could remember on the back of their placemat. I was a bit worried that this would be a bit tricky not knowing the girls writing abilities but it was mostly fine and we just helped a couple of girls. I think I would still leave this game for 7+ for next time though. The prize was a Hello Kitty bath gel, also from Farmers. Luckily I bought a few as there were 3 kids that won the game (something to remember for games like this where there could be more than one winner!)

Next up was the food- I usually do the cake first so that it becomes part of the party food.

For the rest of the food I kept it pretty simple and easy- Amelie and Stella made the marshmellow and grape kebabs before the party and we made crown shaped fairy bread and individual popcorn cases. We also had home-made mini sausages rolls made by Amelie's nana (not pictured)
I made these cupcakes using pink butter icing and these cute lip lollies from Crazy Candies.
We also had Shannon's delicious nail polish cake pops.
For the drink we had lemonade and I made heart shaped ice cubes using raspberry raro - easy!
After the food and drink the girls just played with the new presents (I'll write another blog post with some of Amelie's presents if you are wanting some ideas for great pressies for 6 year old girls) and some played with the Polly Pockets. We are lucky to live walking distance to a little park so when there was about half an hour to go we took the girls for a walk to the park- yay for a sunny day as it is a great way to burn off some sugar!!

And I am giving myself a high five as I read back through this post as I did this party after having giardia for 2 weeks so thank goodness I started early with getting stuff ready because even keeping it as simple as I did regarding the games and food it's still a heck of a lot of work! (worth it tho :)

Next up I'll post about the goodie bags...

Megan x

Wednesday, April 24, 2013

A Girly Girl Party: The Cake

You may have already seen some photo's of Amelie's cake on my Facebook page but I thought I'd share some details as to how I got some ideas for the cake I had in mind and then some more pics of Shannon's amazing creation. 

First off I got some party cakes books from the library and came across these cute jewellery themed ones from the AWW More Cakes for Kids book
 
But then I googled 'make-up cakes' and came across the bottom left pic below of the make-up compact cake from KidSpot. I really liked the idea of a cake looking like a compact(I loved the idea of using edible glitter for the eye shadows!) Then I thought it would be cool to make it similar to the party invitation I made
Then I got a reality check and realised there would be no way I'd have the time or the skills to make a cake like this (and this was before I got giardia so it was doubly lucky!) so I asked the amazing Shannon of Tui Rose Cupcakes if she would be able to make it for me. I sent her the pics below for ideas ...
...and she came back with the most incredible, detailed and gorgeous cake I've ever seen! 
 
I have never ordered a cake before but I'm slowly learning that I can't do everything and the look on Amelie's face when she saw this cake was priceless.  Thank you again Shannon for all your time and effort into this cake- it was so much more than I expected and a true work of art!

But wait there's more...

The reason I actually got the idea for a Girly Girl make-up themed partywas after seeing this pic on pinterest of these nail polish treats - I thought they looked so cool and I knew Amelie would love them as she loves make-up and nail polish.

so I asked Shannon if she would be able to make something similar to these as well (I was going to make these myself but being sick put paid to that as well!) and look what she came up with...
 Instead of using marshmallows she used pieces of cake cut off from the make-up cake so they are really upside down cake pops! I love the detail in the icing and the cute flowers.
 
So go like Shannon's Facebook page if you would like to be inspired by more of her amazing creations or need a cake or cupcakes for a special event.

I'll be sharing more details of the party soon- some more food ideas, games and activities, and the goodie bags :)

Megan x

Monday, April 8, 2013

A girly girl party- invitations

To begin this post I was going to write all about why I'm not actually into little girls growing up before their time, the influence of the media on girls, why I really don't like Bratz dolls etc etc to justify my 6 year olds girly party but I think I'll just say that my 6 year old loves make-up- I believe its a purely innocent thing; she is just fascinated by how it makes her look different, a bit like dressing up really or having her face painted. She has no idea (I think) that woman wear make-up to make themselves look 'better' so long may that last! So when I thought of the idea of a girly girl make-up/nails party it's not coming from any sort of 'beauty' or 'spa'  or 'make-over' perspective which I do think is inappropriate for young girls, its just little girls having fun with what most little girls love, hopefully from an entirely innocent and 'dressing up' place.

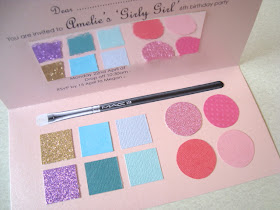
I'm going to break up my blog posts for the party so I'll share my invitations in this post. I got the idea for mine after seeing  this one I saw on pinterest- I liked the idea of making the invitation look like a make-up compact.
Here's my invitation...
I do love how invitations really set the scene for a birthday party so I was really pleased how this turned out. I did the first one and then I let Amelie help me make the rest (with very close supervision ;) and she was so excited, it was really nice to make them together.
Here's the outside of the invitation- if you are into scrapbooking you could have an absolute ball making these as there are so many cool things you could use to decorate the front of the invite. I just printed out the label onto card and cut it out and glued it on but there were some really cool little frames at Spotlight which would look awesome too. 
 
Amelie loved the fuschia pink glitter bows of course while I actually thought the little pink bows looked really sweet so we did a mix.
So here's what I used to make the invites- can't believe I didn't think of getting some paint chips as they would be perfect- already the right size and all the colours you'd want (thanks Kirstine Craw for the idea on my facebook page). I bought the glitter card (which is totally awesome!) and the coloured card from Spotlight, as well as the bows, other stickers and the gem stones. Also the pink A4 pack of card, the pink envelopes and the silver card for the mirror. In the end the silver card didn't look that much like a mirror so we covered it in tin foil which looked pretty good.
My first invite I made I used this awesome card that looks just like a mirror- it pays to keep things I tell you as I just kept this from a box that had some shower gel or something in it- I knew it would come in handy!
I printed out the details of the party onto each piece of A4 card leaving a gap between the text for the mirror. Then I folded the invite in half so it would fit inside the envelopes and cut off the rest of the card from the bottom. Then I stuck on the brush that I printed out from here and cut out and stuck on the eye shadows and blushers/lip glosses/lip sticks colours.
We found these stickers at Spotlight as well ($2 for 8 sheets of them!) so we used them to decorate the envelopes and will prob use them to decorate the goodie bags as well.
So there you go- am looking forward to sharing more of my party stuff with you soon :)
Megan x

Wednesday, April 3, 2013

A Little House giveaway

To celebrate having sold our house and to share my love of anything with a house theme I'm having a 'Little House' giveaway! I've collaborated with Meg from one of my favourite stores 'Tea Pea' and made up a parcel of treats for one lucky reader. 
Here's what you could win...

* a set of 3 wooden stacking houses from Tea Pea- these are the cutest containers to store bits and bobs in and you can decorate them too!
* a handmade house zip pouch I made inspired by the house pouch tutorial in the book Zakka Style
* a handmade house keyring inspired by this one made by Attic 24
*a roll of green and white striped washi tape
* 2 sheets of Dutch Door stickers
* 3 x Cath Kidston mini notepaper and envelopes + 5 x paper treat bags with handprinted house stamp
So if you would like to win these little house treats leave a comment here or on my Facebook page telling me your dream home style..is it contemporary modern, vintage cottage, character home, 
beach house, scandi chic, rustic country house...or a mix of a few or one I haven't thought of...?
And for extra entries you can....


Just leave a separate comment for each additional entry (I've taken word verification off my comment settings).  Giveaway open to all so international entries are welcome - entries close Wednesday 16th April.
Good luck! 
Megan x