Showing posts with label interiors. Show all posts

Wednesday, May 20, 2015

Craft Room Pegboard DIY

As part of our renovation last year we converted a small room and half of a bedroom into a craft room/office space. Because we stuck within the existing exterior walls of the house for this part of our reno the room is just under 2 metres wide but is nearly 6 metres long. So a very long but narrowish space means clever storage as I needed to maximise every inch of this space (still have had to overflow some of it to other areas in the house... ). Pegboard is so popular at the moment and it really is the most awesome product to store and display stuff- it's great for craft rooms, offices, garages for tools, and I am wanting it for the kids bedrooms now too as wall storage is the way to go with all their bits and bobs! I think pegboard would be fab in classrooms too for storing art and craft supplies, stationery items and other things teachers use on a daily basis. So here are a few pics of mine and how we made it...

Craft Room Pegboard DIY

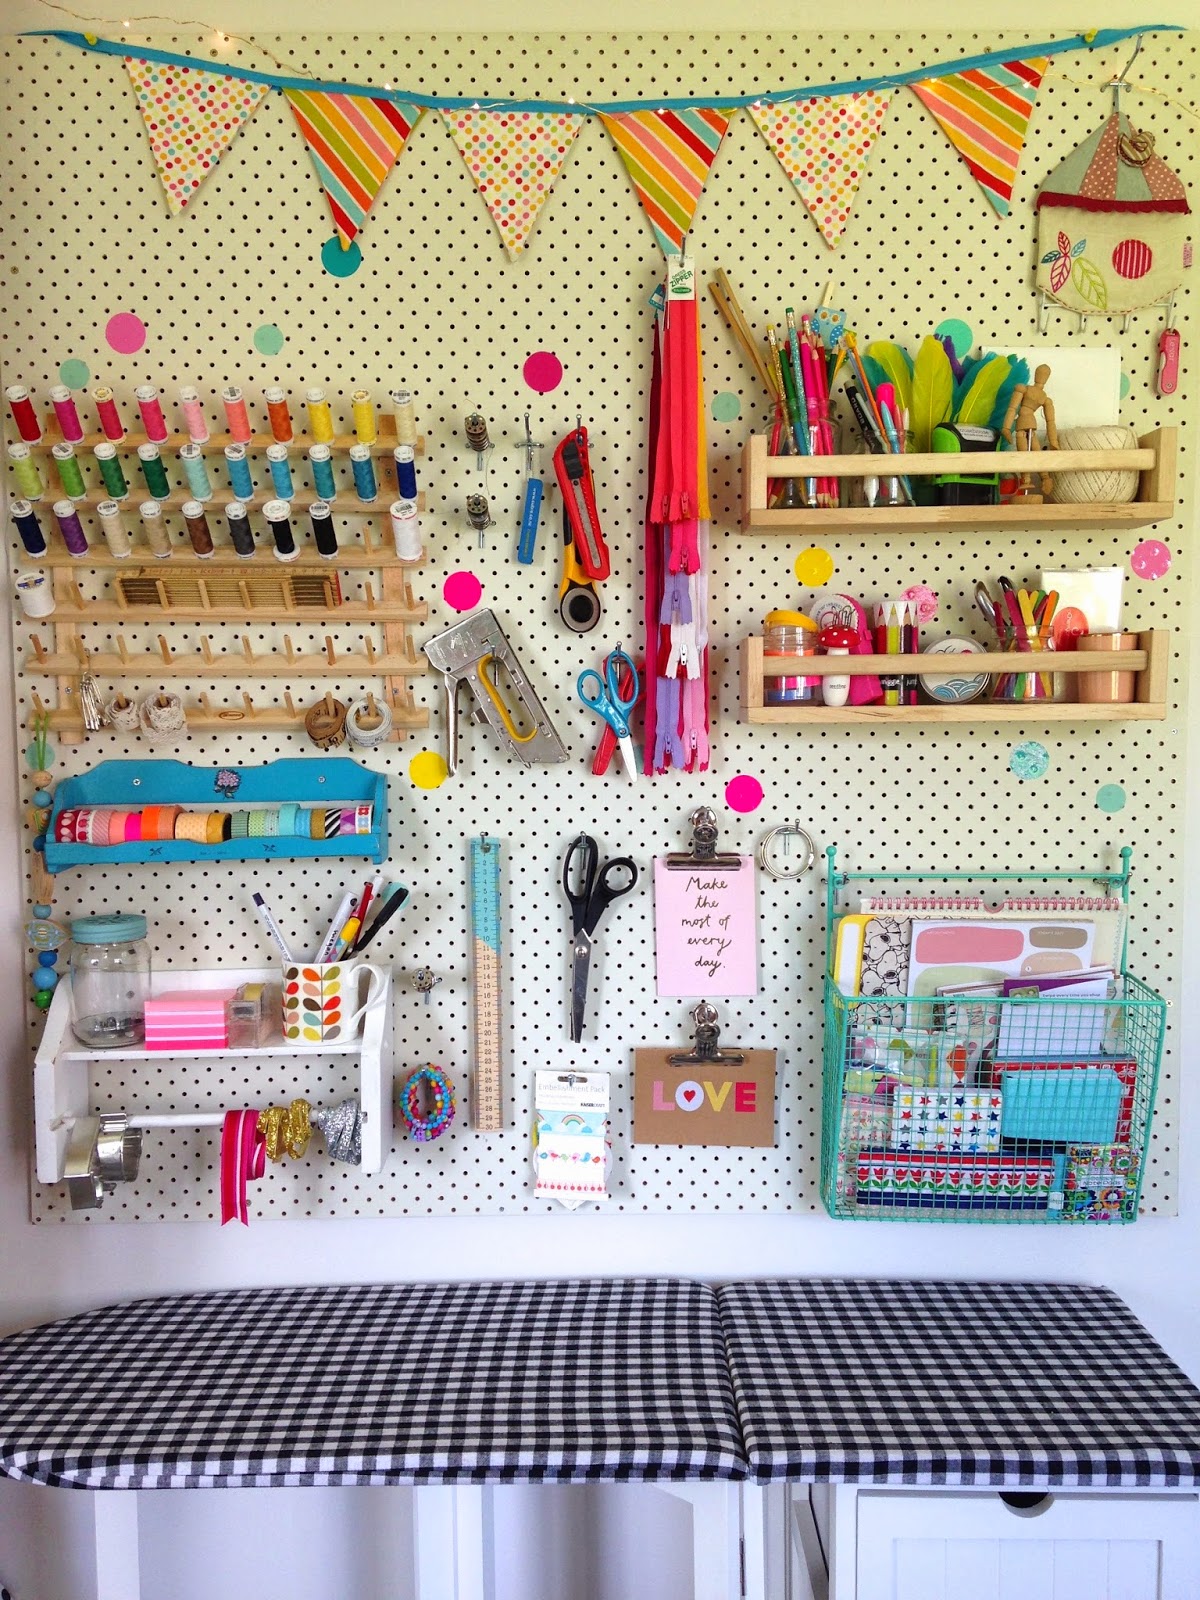
We bought the pegboard from Bunnings- it comes in two colours and two sizes - this is their square 1200mm x 1200mm size sheet. It is a creamy white colour which I was happy with- you could very easily paint it though in any colour you wanted to. The other size it came in was half of this so 1200mm x 600mm. It also comes in a dark brown colour.

To fix it to the wall you are going to need a gap behind it for the hooks to have a space to go into (unless you do what Gillian from Mudbird Ceramics did which was screw mini dowels into the holes instead of hooks then you can screw it straight into the wall).
So my hubby made a frame out of some beading (also from Bunnings) which he screwed to the pegboard, and then it just needed a couple of screws in each corner to screw it to the wall.

Now for some details about all the things I have on my pegboard....

The wooden thread holder was from Spotlight (thanks to Penny from Little Housewife for telling me where to find one- it was about $20)
The turquoise spice rack underneath was from Trade me and is the perfect size for holding some of my wash tape collection.
The little shelf underneath was also from TradeMe and used to be in our playhouse

The wooden shelves are Ikea Spice racks- I bought them from Akia- they are $9 each.  I love these little shelves- I also have one in our ensuite. I was going to paint them before putting them up but I actually like them like this now.

The green wire basket is from TeaPea. I love these baskets and have them in a few places in our home  - the girls have one each above their desks, and I have one in the kitchen for all the artworks/paper that comes home from school /daycare.


The pegboard hooks are from Bunnings- they come in two length so I got a mix of them. I bought some bulldog clips to put on some of the hooks for these cards from Kikki K and Small Acorns- these would be great in kids bedroom to hold their certificates and photos too. Mitre Ten also has a great range of pegboard hooks - more than what Bunnings has from looking on their website... 

The cute fold out ironing board underneath my pegboard is from Wallace Cotton after a friend told me about them being half price in a sale last year. (doesn't look like they have any stock of them at the moment on their website). The spot stickers are 'Abi's dots' from Alex Fulton.


So there you go, some ideas for a pegboard wall of your own!
Thanks for reading and keep an eye out on my Facebook page and Instagram for another DIY coming soon- how to make a chalkboard wall household command centre.... 
Megan x

Monday, February 16, 2015

DIY Pin Board with Scotch® Expressions Tape

For my last project as part of the Scotch® Expressions Tape 'Back to School' campaign I was asked to come up with a tutorial for making a school pin board using Scotch® Expressions Tapes.  I loved doing this as I think pin boards are a great addition to a child's bedroom for their treasures and keepsakes, and to keep them organised and tidy as well! I remembered this noticeboard tutorial I wrote a few years ago now http://domesticblissnz.blogspot.co.nz/2010/10/my-creative-space-handy-noticeboard.html with the plastic pocket along the bottom of the noticeboard and it made me think I could do the same thing, but much easier and quicker, with the Scotch® Expressions Tapes, in particular the Scotch® Expressions Duct Tape. So here is a tutorial for how to make this colourful and practical pin board for your child, or even for yourself- a bigger one would be great as a family organiser with a calendar, household essentials, and a place for invitations, cards, school notices etc…

DIY Pin Board with Scotch® Expressions Tape Tutorial

You will need:
*a pin board - this square one is from Warehouse Stationery- you can also find them at Spotlight, or office supply stores, or go to Bunnings and get a sheet of Pinex and cut it the size you want.
*Scotch® Expressions Duct Tape- I used their cute red and white polka dot one- you can find all the Scotch® Expressions Tapes at Warehouse Stationery
*Scotch® Expressions masking tape - I used this lovely coral red coloured one
* Scotch® Expressions Washi Tape- I used their bright neon pink washi tape
* Scotch® Expressions Magic Tape in multicoloured polka dots
* bulldog clip
*hook push pins (I got these from Bunnings in the picture hook aisle)
*push pins
*PVC clear tablecloth plastic for the pocket- enough to cover the width of your noticeboard plus enough to go around the back of the board, and height of around 10cm plus enough to go around the bottom of the board

1. Cover your pin board with the Scotch® Expressions Duct Tape

2. Lay your piece of tablecloth plastic across the bottom of your board

3. Flip your board over and use pieces of Scotch® Expressions Duct Tape to attach the plastic to the board- don't pull it too tight as that will make it tricky to get things in and out of the pocket.

4. Flip your board back over and tape a stripe or two of Scotch® Expressions Washi Tape across the top of the pocket.

5. Use your Scotch® Expressions masking tape and Scotch® Expressions Magic tape to make some dividers on your board (I layered the magic tape on top of the masking tape).

6. Use a push pin to attach your bulldog clip to the pin board.
7. Choose where you would like to put the push pin hooks on the board.
 
8. Pop some things in the pocket that your child uses regularly, and let them choose a few things they would like to put on the board- certificates, photos, a timetable….anything goes!

And this week is the last week of the Scotch® Expressions Tape 'Back to School' campaign so head on over to the Scotch Australia and New Zealand Facebook Page and click on the 'Back to School' link to see lots more awesome tutorials, plus the chance to win a $100 prezzy card by sharing your own creations! I hope you've enjoyed seeing my three tutorials, including my 

You can also follow Scotch® Australia and New Zealand on Instagram
and on Pinterest

Happy crafting!
Megan

Related Posts with Thumbnails