Thursday, October 28, 2010

my creative space: kids stuff

Today my creative space is all about kids stuff. I've been wanting to make some tin can phones for ages as my sister and I had so much fun playing with them when we were little. Last night I decorated two cans with kozo tape and attached the string- we tried them out today and they really do work! I love good old fashioned kids toys that have been around for ever :)

And the other day for the 5 year old class I teach in we made bubble blowers out of pipe cleaners -the kids had heaps of fun blowing and chasing bubbles. The pipe cleaners get pretty soggy but for a cheap and quick bubble blower that kids can make themselves they were great.
Ttoday I tried out making my own bubble mixture- I used this recipe and it worked well. 
  • half a cup of water
  • half a cup of dishwashing liquid
  • 6 drops of glycerin (I got this from the chemist- it was called Glycerol but apparently it's the same thing)
Stoked with this photo from the other day snapped mid bubble blow!

And I bought some Shrinky Dinks the other day for a rainy afternoon activity after seeing it on Cotton Kiwi's blog. Thanks Sarah for sharing these- I'd never heard of them before! It is this cool plastic paper stuff that you draw pictures on and then you cut them out and put them in the oven and they shrink and harden so you can use them for bag tags, jewellery and heaps more. Amelie loved seeing them shrink and shrivel up in the oven and then fold out flat. I just bought the refill pack instead of the pack with the drawings and you get quite a few sheets so it should last for a few more rainy afternoons yet. 
For loads more creative spaces visit Kirsty's here
Thanks for visiting!
Megan
PS: I am doing some seed growing with my 5 year old class next week- sowing seeds in yoghurt containers. Can anyone tell me what would be a good seed/plant to sow that comes up nice and quick? I was thinking of sunflowers or beans? or maybe cress or even grass would be quicker? Thanks!

Thursday, October 7, 2010

my creative space: a handy noticeboard tutorial

I've been wanting to make Amelie a noticeboard for her room for ages but I just couldn't find the right fabric to go with her blue walls..until I came across this lovely fabric called Cotton Bird Trail from Kate Fitzpatrick.  I wanted to make a noticeboard that also held all her bits and pieces that end up all over the house so I came up with the idea of adding a plastic pocket to the bottom of the noticeboard for all her hair clips, bobbles, headbands etc.   (I should add that they are still all over the house but at least they have a home now at the end of the day!) It actually didn't take much time at all- maybe an hour at the most so I thought I'd share it with you.
You'll need
* a piece of pinex cut to the size you want - I got it from ITM building supplies
* a piece of fabric big enough to cover the noticeboard
* a gun stapler
* some clear plastic (I get mine from Payless Plastics- you buy it off the roll- about $5 for half a metre)
* some bias binding

1. To work out how much fabric to cut, measure the width and length of your piece of pinex, then add about 5-10 cm to those measurements (depending on how thick your piece of pinex is- you want to cover the pinex including the sides with lots of room on the back to staple the fabric down easily) and cut out your fabric to those measurements.
2. Measure a piece of clear plastic the width of the piece of fabric and however much high you want it to be (mine was about 18 cm which includes some of the plastic going around the bottom of the noticeboard and stapled on the back- my pocket is about 15cm high finished)
3. Cut out your plastic and cut a piece of bias binding the width of the plastic
4. Sew the binding to the top of the plastic
 
5. Staple gun your fabric onto the piece of pinex
6. Place your plastic pocket on top of the fabric, fold it around the sides of the noticeboard and staple gun it to the back, sides and bottom of the noticeboard. 
A tip- when you staple the plastic let it have a bit of give instead of stapling it really tightly and flat to the noticeboard otherwise little fingers will find it tricky to get things out of the pocket! When I made mine I actually sewed three pockets into the plastic but I wouldn't do that again as it is quite tricky to get the things out of the pockets- it would be a lot easier if it was just one big pocket like in the tutorial.
7. I just stapled gunned a piece of string to the back to hang it but it isn't working very well so I'm going to get some little screws or something to attach the string to so the staples don't keep popping out when Amelie pulls on the noticeboard!
 
So there you have it- any questions just let me know! For more creative spaces head over to Kootoyoo.
Megan 
PS: Have you entered my facebook giveaway yet?
PPS: head on over to Sew Funky's blog to sign up for the kiwi christmas ornament swap!

Tuesday, September 28, 2010

gifts for girls

Well it has been the most beautiful couple of days here in the sunny BOP - after the equivalent of a year's worth of rain in the last six months it's about time we had some sun! Combined with daylight savings it's been lovely- we've had a morning at the beach, lots of time in the garden, a dinner outside and even got some washing dried on the line for a change! 

Anyway, I thought I'd share a few pics of some cute pressies for little girls I've bought or made lately...
I bought this gorgeous skirt for Miss 3 for christmas from the very clever Sarah from Cotton Kiwi via the Felt Aid shop. She is going to love it as her favourite things at the moment are playing dress ups and dancing (like a lot of 3 year olds girls!)
I made a personalised pillowcase and a toilet bag for a little girl's second birthday.
This is going to be a pencil case for a 6 year old girl- her mum took her to Bernina to choose her own fabric and zip as I didn't have any fabric in her favourite colour!
I couldn't resist buying this cute fairy finger puppet the other day for the girls. I found it at the teacher resource shop in Tauranga which is a really great shop (even for non-teachers!) Heaps of cute little things and reasonably priced too.
Well, here's hoping for another nice day tomorrow!
Megan x

Thursday, September 23, 2010

my creative space: pink flower purses

I've had this lovely fabric from Kate Fitzpatrick for a while now- I bought it about 5 years ago to cover a noticeboard in our old house but I had a bit left over for a few little projects. I used some to make a make-up/toilet bag for my mother in law...
...and I used some more to make a little make-up purse and lavender sachet for a friend for her birthday.
I used the same pattern for the purse as I did for the bridesmaid purses I made recently but just made it shorter and lined it with nylon.
I've still got a little bit left too which is good!
For more creative spaces visit Kirsty's here
Megan

Saturday, September 18, 2010

Margaret Mahy inspiration

One of my favourite authors of children's books is New Zealand author Margaret Mahy. I took Miss 3 into town this morning and saw a display of Margaret Mahy books at Books A Plenty with a sign for a Margaret Mahy exhibition at the Tauranga Art Gallery so along we went. It was a lovely exhibition inspired by her poetry with beautifully illustrated drawings by David Elliot.  The Art Gallery is holding 'Story Telling sessions' related to the exhibition in the school holidays which sound like fun.
Then we walked along to the library where I got this book out "The hand that first held mine" by one of my favourite novelists Maggie O'Farrell. Amelie chose a couple of DVD's to take home (we really should be taking home books too!)  and I spotted this Margaret Mahy collection so we got that too.
It's got the "The Witch in the Cherry Tree" on it which I loved reading when I was little.
(I found a Brambly Hedge DVD too so had to get that one as well!)
Margaret Mahy's first book published,  "The Lion in the Meadow",  is still one of my all time favourite children's books and is already one of my toddlers favourites too.
I took this book to school the other day for the five year old class I teach in. I read them the story and we talked about how the mother gives the little boy a matchbox with a dragon in it to scare the lion away.  I gave them all their own matchbox and they decorated it with kozo tape and drew and cut out a little animal to put inside the matchbox to scare the lion away (although some decided they wanted the animal in the matchbox to be friends with the lion instead which was cute!)
Happy reading!
Megan

Wednesday, September 15, 2010

a kids questionnaire

Here's something fun to do with your little ones...my sister found this questionnaire on this funny blog so she asked my three and a half year old the questions the other day. It was pretty funny reading her answers! Definitely something to pop in the memory box and have a giggle about when she's older.

1) What is something Mummy always says to you?
That I’m beautiful and cute, and that she loves me.
2) What makes Mummy happy?
When I talk nicely to her, and that she loves me.
3) What makes Mummy sad?
Don’t know.
4) How does your Mummy make you laugh?
When she laughs at me!
5) What did your Mummy like to do when she was little?
Play puzzles and read girl books.
6) How old is Mummy?
Don’t know.
7) How tall is your Mummy?
Medium
8) What is her favourite thing to watch on TV?
The Go Show
9) What does your Mummy do when you’re not there?
Has a sleep and does her jobs.
10) What is Mummy really good at?
Reading stories to me. Stitching and sewing. I miss her when she’s at the sewing shop. I stay at home with Daddy and Stella and we eat a nummy dinner.
11) What is your Mummy not very good at?
Reading funny books without her glasses.
12) What does Mummy do for her job?
Sewing. She gets her money from the money shop when she needs more.
13) What is your Mummy’s favourite food?
M&Ms. Roast chicken.
14) What makes you proud of your Mummy?
Doing beautiful pictures with her.
15) If your Mummy were a cartoon character, who would she be?
Don’t know.
16) What do you and your Mummy do together?
We go to bed and have cuddles.
17) How are you and Mummy the same?
*a whole lot of gibberish about who the tallest is and reaching really high books*
18) How are you and your Mummy different?
Don’t know.
19) How do you know your Mummy loves you?
She gives me presents.
20) What does your Mummy love most about your Daddy?
Chicken pie.
21) Where is your Mummy’s favourite place to go?
Bernina (sewing shop)
22) What is one thing you wish you could change about Mummy?
I would turn her into a frog! *gales of laughter* cause I like doing that when I’m a fairy. And a princess.
23) What would your Mummy do with a million dollars?
Buy lots of toys for me. Buy Superman. Buy lots of zips. (pronounced thipth).
24) What do you wish you could go and do with your Mummy?
Play schools and have morning tea.
25) What is one thing you hope never changes about Mummy?
I hope she never turns into a frog.


Megan

Friday, September 3, 2010

a reversible shoulder bag

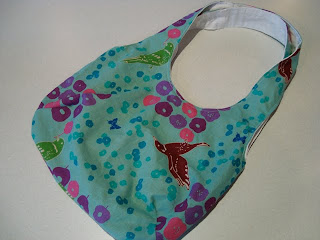
My sister Amy put in a request for a shoulder bag for her honeymoon so I found this great tutorial at the fab blog verypurpleperson.com. It has really clear instructions with photo's and the pattern too.
I ordered some lovely Echino fabric from stitchbird.co.nz for Amy's bag and used some fabric I already had (also from Stitchbird) for my one as I decided that I really needed another bag too (*insert snort from husband here*).
I just used some white cotton duck for the lining for Amy's bag so it's not really reversible (unless she wants a white bag some days!) but the duck was good for making the bag nice and strong.
One thing I found when I made up Amy's bag was that the strap ended up too short so I had to unpick and add a 10cm approx panel to the strap.
So I added a 5 cm approx panel to the pattern when I made up my bag.
It's a great size for a shoulder bag, not too big but big enough for all my day to day stuff. 
I also like the look of this tutorial from Tinyhappy for a shoulder bag with just one strap that you wear across your body which I find great when I'm out and about with the kids.
...And on a completely different tangent, have you seen these in the supermarket? 
I went in there the other day as you do to get just one thing and ended up buying all three of these as well...naughty end of the aisle promotions!!  I have a friend that used to have a bit of an addiction to Squiggle Tops...maybe these will find their way to her mail box soon..
Megan x

Thursday, August 26, 2010

my creative space: bridesmaid purses

We had my sister Amy's wedding in Hawkes Bay in the weekend - we had such a great day getting all glam, the ceremony was beautiful and the reception was a lot of fun! There were even bag pipes after the ceremony playing "Scotland the Brave' which sounded amazing walking out of the church. Miss 3 and Miss 1 were flower girls and wore these cute-as Mary Janes from Cherish Child with cream stockings and these lovely dresses from Hatched Boutique.  The fairy wand with flowers was a really cute idea too.
Amy asked me to make some purses for me and the other two bridesmaids for the wedding. Luckily I had just been given some curtain fabric sample waterfalls that weren't needed anymore from Guthrie Bowron in Tauranga which were perfect for the purses (thanks Sue!)  I was going to try to make a purse with a flap over the top but in the end I decided a zip one would be better to keep everything in so I made up a pattern myself. I wanted to make them a bit rounded with a couple of pleats so was really pleased with how they turned out.
The fabrics were perfect in that they were the same pattern but different colours so we knew which one was which. So if you are after some nice fabrics for small things then curtain and other upholstery type shops might just be the place to try!
I had the same fabric in black too so I made another one for me as I thought it would make a nice 'going out' clutch (not that I get out much!!!)
Amy and her hubby are on their honeymoon now in Bali lucky things!!!
For more creative spaces, visit Kirsty's here
Megan

Wednesday, August 18, 2010

patchwork

I had my first go at some patchwork in the weekend- a patchwork cushion using some of my reds and pinks fabric scraps ...
and an Elmer cushion from the book "Elmer the patchwork elephant" by David McKee. 
(Elmer's a bit wonky whoops!)
I really like doing patchwork- it's pretty cool to make a whole new fabric from a lot of little scraps!
Megan
PS: If you are an Elmer fan I found some great activities here to go with the book...
http://www.randomhouse.co.uk/childrens/elmer/home.htm

Saturday, August 14, 2010

rainy day kids ideas

I've just started back teaching one day a week and one of the classes I'm teaching is 5 year olds. Their teacher wants me to do lots of 'language experience' activities where we do an activity or listen to a book and then write and draw about it. So I dragged all my old resources out and made a list of ideas and practiced a few on my 3 year old.   I thought I'd share them with you if you're wanting some things to do this rainy weekend! (Both activities use things you've probably got around the house)
Magic Milk
This activity is a great little science one and also good for learning about colours/colour mixing.
You will need
  • full fat milk (full fat seems to work better than trim, also warmer milk seems to work better than milk straight out of the fridge)
  • food colouring- red, blue, yellow and green
  • eye droppers
  • dishwashing liquid (I use Palmolive, a teacher said she used the cheap pink stuff and it didn't work that well)
  • saucer
1. Pour milk into saucer
2. Put a drop of each food colouring into the saucer (top, bottom, left and right like this)
(I used way too much food colouring here, two or three drops is enough!)
3. Squirt a bit of dishwashing liquid into the middle of the saucer
4. Watch what happens (it's pretty cool!)

Magic pictures
The teacher in the 5 year old class I'm in had just done this with the class so it was a good memory jogger for me as I used to like doing this activity with my own classes -it's neat as an intro to print making but is also just a good art activity that can take a little while to do which is always good!!
You'll need
  • A4 paper 
  • chalk (any colour)
  • crayons 
  • sharp pencil
1. Fold the piece of paper in half width ways and cover the inside right side with chalk quite thickly
2. Now cover the chalk with crayon; again the thicker the better (no gaps ). You can just cover the chalk in one colour, do stripes like mine horizontally or vertically, thick zig zag lines, anything really as long as the crayon completely covers the chalk.
3. Fold the piece of paper back over like a card, draw on the front of the 'card' with the sharp pencil. Colour in some of the pictures with the pencil to see what happens when you open the card (like my heart and the birds wing)
You could get them to write their name too- kids love seeing their name backwards!
4. Open up the card and see how the picture has lifted from the right side and made a print onto the left side!
Have fun!
Megan
Related Posts with Thumbnails