Thursday, September 10, 2015

A French Themed Birthday Party

The good thing about going through all my photos finally is that I find all these photos for blog posts I have meaning to write for a good while now! So I thought I would share these photos of the french themed birthday party I did for Amelie back in April. I wanted to keep her party small this year as I had just had Jack's first birthday party- well he turned 4 but it was his first actual party and is 3 days before Amelie's.  So it was just three friends plus her sister Stella and a friend of Stella's. So here are the details and a few ideas if you have a little francophile in your house!

Invitations
I made these boarding pass invitations on my mac computer using the 'Pages' programme. I love these as I think they actually look pretty close to real ones but in a fun way with the Eiffel Tower on them :) 

Decorations

I made some red, white and blue bunting by cutting out rectangles and stitching them onto some white binding.
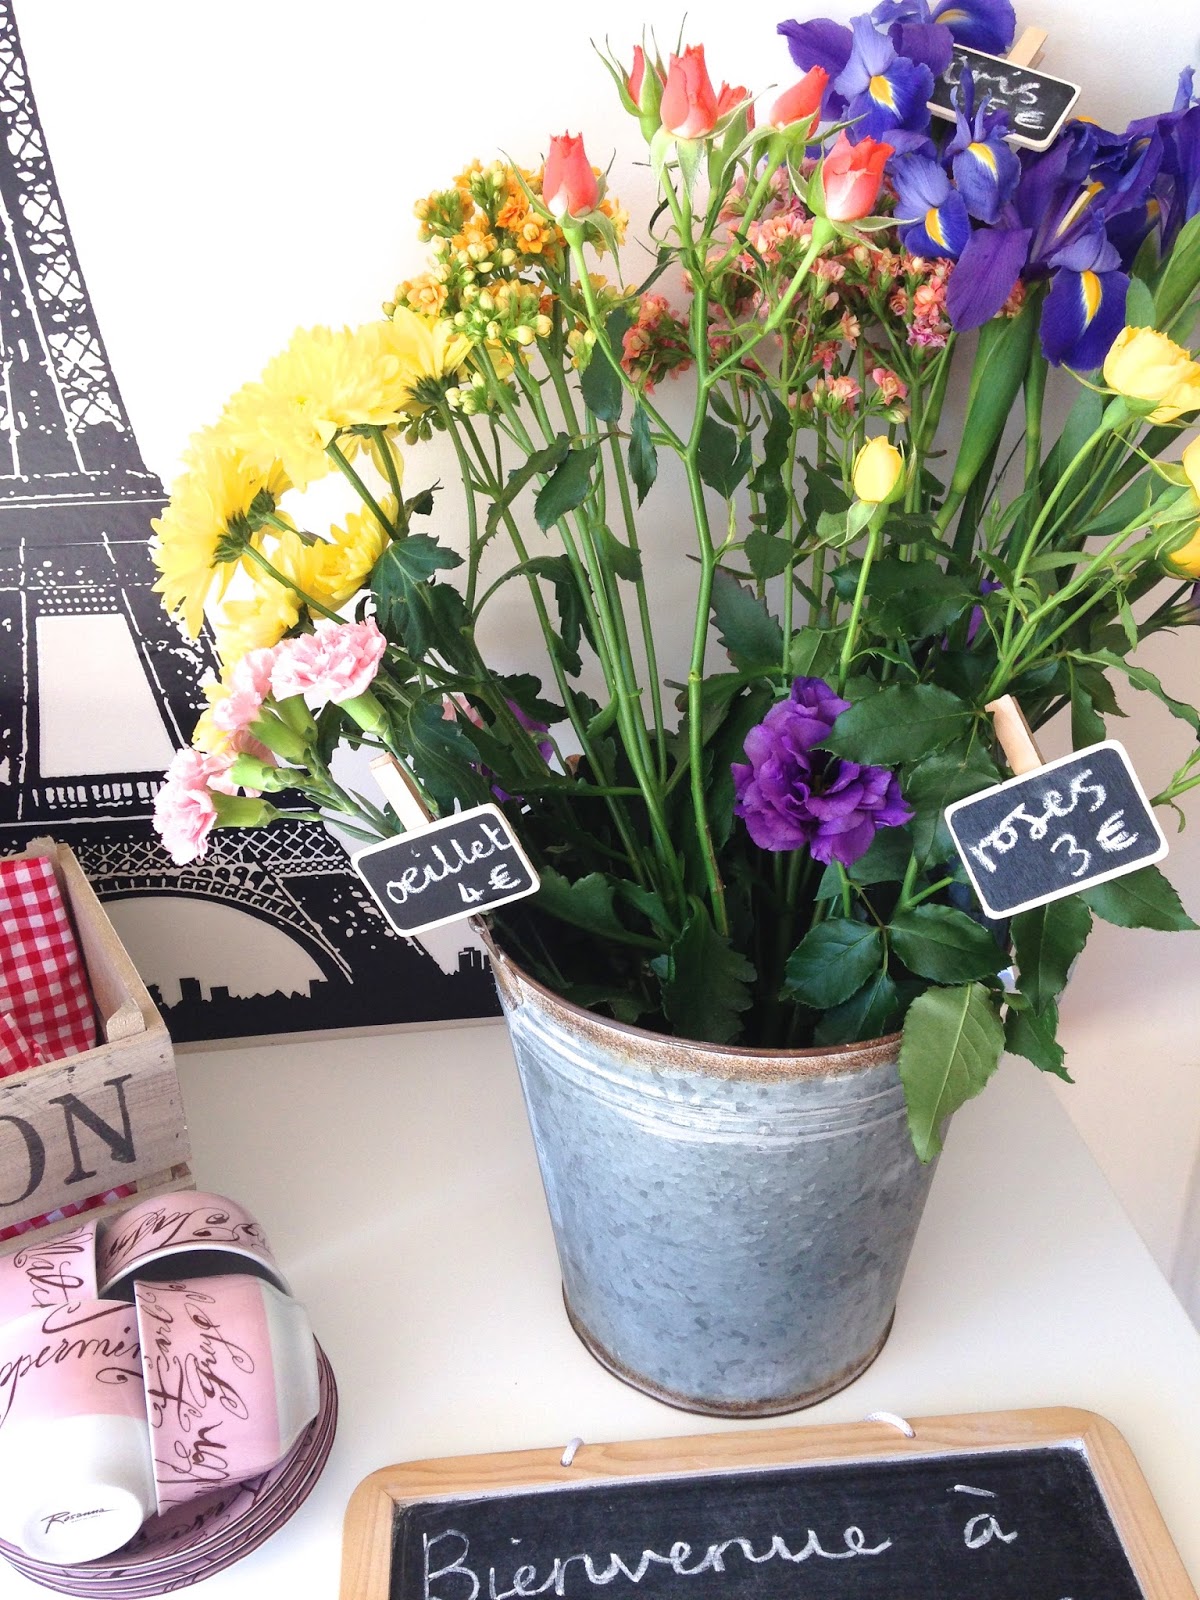
I bought the antique looking zinc bucket and filled it with flowers from our local florist to make it look like a french florist.
The Eiffel tower decal was only $10 from Trademe and is now in Amelie's bedroom. The 'Avignon' wooden crate was from a kitchen store here in Tauranga 'Gourmet Trader'.
The Eiffel towers we already had (the pen was a cute one from Typo). I bought the little Eiffel tower place card holders from Trademe.
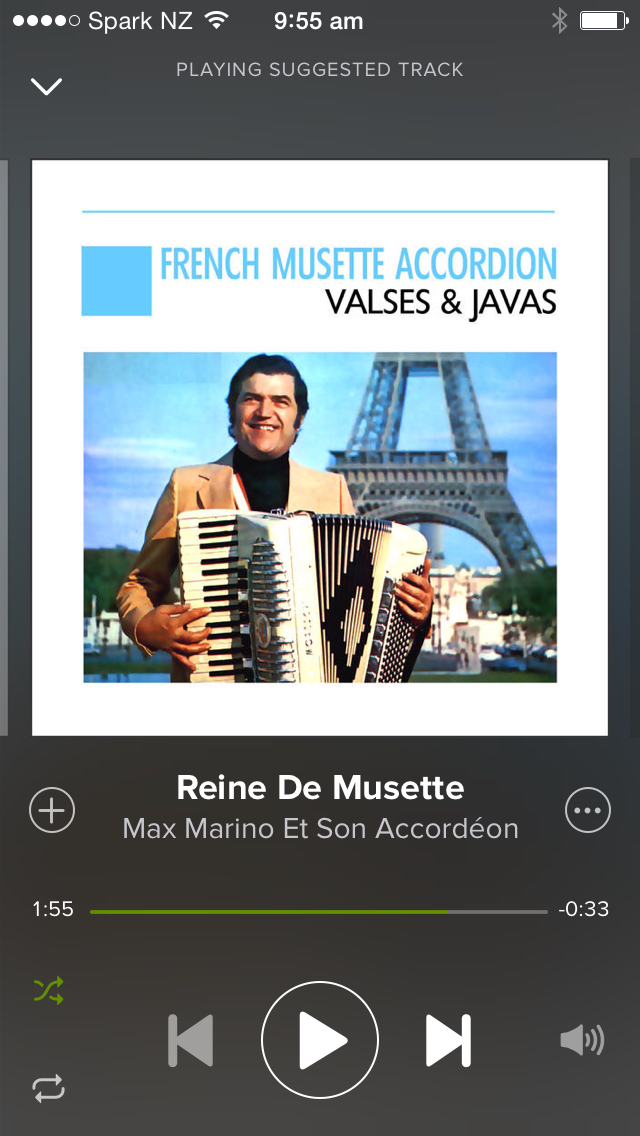
We played some french accordion music using Spotify.

Food
As seen below...
'Croque monsieur'- ham and cheese toasties
Macarons
Chocolate eiffel tower cupcakes- I found a mold for these and just poured in melted choclate to make the Eiffel Towers.

'frites'
We were going to do croissants and pain au chocolat's too but it was Anzac Day so the supermarkets were shut for the morning!


Cake
I bought this cake from New World and just added the jaffa's and the mini bunting I made using straws and wash tape. The sparkly '8' decoration was from Gourmet Trader.
Activities
I had a few colouring sheets for the girls to do when they arrived
Seeing as french women love perfume the girls made our own using water and essential oils.

And they made a little posy of flowers each as well just like a french florist. I bought a piece of oasis for $5 which was enough for all of them to have a piece to stick their flowers into and then we wrapped them in brown paper.

We played the chocolate game seeing as the french love their chocolate. This was heaps of fun, love this classic party game! For the dress ups we used a beret, scarf and gloves.
We even had french plaits at the party!

So there you go- a few ideas for you- it was a nice easy and fun party for my lovely french loving 8 year old :)

Thanks for reading, 
Megan

Sunday, September 6, 2015

Easy Kids Party Ideas

I always like thinking of ideas for kids parties, things that are quick and easy to prepare, which will keep everyone entertained.  'Pass-the-parcel' can take a while to wrap up, and a DIY piƱata can take a lot of effort too! Then some new Allen’s lollies arrived at my door just at the right time (the kids are really loving me having a blog at the moment).  In my bumper pack I received the new Allen's Tangy Tots and Jelly Tots, and the popular Snakes Alive - how much do kids love jelly snakes? Here’s a few of my activity ideas that I’d love to share with you...

1. Lolly Bracelets 

This idea is my favourite as it's so easy and kids love making them- it makes for a nice quiet party activity, or something to make before the party as a treat for all the party goers. All you need is some thin elastic, a tapestry needle (these have a big eye to threaad the elastic and are much blunter than normal needles for little hands), and the Jelly Tots. Thread the elastic, tie a knot in one end and thread on the lollies. I used 12-14 for these bracelets which is about a serving size (again this is a good way to control portions!). Tie a knot when you've threaded all of the lollies and cut off excess elastic.

2. Lolly Kebabs 

Whenever we got to Taupo we love going to the awesome Cafe L'Arte in Acacia Bay- they have lolly sticks there which is the kids big treat. So that gave me the idea to make some using the Allen's lollies- they are so easy to make and for some reason kids love things on sticks! And it's better than a bowl of lollies on the table too as you can control the portions of lollies for each guest. These would make a fun 'take home' treat too. Just get a wooden skewer, the lollies and some washi tape, thread them on and tape a bit of washi tape to the top of the stick- easy! 

3. Don't Eat Pete! 
I came across this party game idea when I was getting ideas for Stella's lego party- basically you put a lolly on each monster (search 'lego don't eat pete' for a lego man version), then one child leaves the room, the rest of the kids decide who is going to be Pete, then the child comes back in and gets to pick one lolly at a time to eat from each monster…but if they land on Pete they have to stop and it's a new child's turn. It's sort of similar to another party favourite 'The Chocolate Game'- my favourite when I was a kid!  Here is the blog I got the free template from for the game... http://www.theteacherwife.com/2012/09/dont-eat-pete.html 
So there you go, three easy ideas for your next kids birthday party. Let me know what you think of them! 

Thanks for reading, 
Megan


Friday, August 7, 2015

Home Sweet Home Sewing and Stitching Group

I mentioned recently on FB that I am taking a sewing and stitching group at my daughters school for the next 5 weeks one afternoon a weel- they do an awesome 'Adventure Time' programme where teachers and parents choose some of their favourite activities or things they are experts at and students get to choose what group they would like to join- it's a bit like what I remember of 'Clubs' when I was at primary school- I remember knitting and cooking clubs- and they are still on offer which is great but there's also movie making, computer coding, mountain bike riding, contact sports, fishing, art history, dance and more... lucky kids! So I thought I'd share a few pics of what we got up to today in my group- I called it 'Home Sweet Home' as all of our projects are going to have a little house theme (one of my favourites!). 
I brought it some hand stitching examples I have in our home- I wrote a blog post about the stitched handprints here if it appeals to you...
I blogged about the babushka art here
I did the washing line one and the lady in the flowers needlepoint pieces years ago, before I even got right into sewing and crafting. They are designed by Jennifer Pudney and are really easy to do as the drawings are on the fabric so its like colouring in with stitches!
My nana, Noelene stitched the beautiful alphabet sampler- she was an exceptionally good seamstress and stitcher so it's lovely to have some of her work in our home.

I brought a few books in for the girls to have a look at to get inspired and see all the cool things they can make once they get into crafting.
And my favourite thing was this booklet I put together for each of the girls. I used to have to put booklets together all the time for presentations and workshops when I was full time teaching so it was fun to use these skills again to put it together.
I googled some 'sewing fonts' and found a few cute ones to use on the cover- the font for the 'Home Sweet Home' title is this one called Fabrics 
 
I left the second page blank for them to practice some stitches on hessian and glue it into their booklet. On the opposite page I found some clip art diagrams of different stitches. Today I taught them running stitch and back stitch.

I made up a sewing themed word find on the next page- there are heaps of free word search generators around - I used this one
I found a clip art sewing machine diagram for the next page.

For the last 2 pages I wrote a list of the projects we are going to do- and then my favourite page is the last page- I stuck samples of different fabrics on the page and the girls have to find out the names of each one.
Today's project was to create a house picture using running stitch and back stitch using yarn and a tapestry needle. I gave them each a square of hessian (I sewed around each one to stop them fraying) and showed them my one I stitched last night.  I used the house from one of my favourite picture books for my stitched picture (highly recommend this lovely book which is 60 years old this year- my kids and every class I read it to love it.) 
The Little House
It was really fun seeing them stitching away- lots of needles needing threading and a few fix ups but on the whole they got the hang of it pretty quickly - but they only got a little bit done of their pictures so hopefully they will bring them back next week so I can take a few pics. I sent them off with a little house cookie each. 

Next week we are making little felt house keyrings and bag charms.
Thanks for reading :) 
Megan

Wednesday, May 20, 2015

Craft Room Pegboard DIY

As part of our renovation last year we converted a small room and half of a bedroom into a craft room/office space. Because we stuck within the existing exterior walls of the house for this part of our reno the room is just under 2 metres wide but is nearly 6 metres long. So a very long but narrowish space means clever storage as I needed to maximise every inch of this space (still have had to overflow some of it to other areas in the house... ). Pegboard is so popular at the moment and it really is the most awesome product to store and display stuff- it's great for craft rooms, offices, garages for tools, and I am wanting it for the kids bedrooms now too as wall storage is the way to go with all their bits and bobs! I think pegboard would be fab in classrooms too for storing art and craft supplies, stationery items and other things teachers use on a daily basis. So here are a few pics of mine and how we made it...

Craft Room Pegboard DIY

We bought the pegboard from Bunnings- it comes in two colours and two sizes - this is their square 1200mm x 1200mm size sheet. It is a creamy white colour which I was happy with- you could very easily paint it though in any colour you wanted to. The other size it came in was half of this so 1200mm x 600mm. It also comes in a dark brown colour.

To fix it to the wall you are going to need a gap behind it for the hooks to have a space to go into (unless you do what Gillian from Mudbird Ceramics did which was screw mini dowels into the holes instead of hooks then you can screw it straight into the wall).
So my hubby made a frame out of some beading (also from Bunnings) which he screwed to the pegboard, and then it just needed a couple of screws in each corner to screw it to the wall.

Now for some details about all the things I have on my pegboard....

The wooden thread holder was from Spotlight (thanks to Penny from Little Housewife for telling me where to find one- it was about $20)
The turquoise spice rack underneath was from Trade me and is the perfect size for holding some of my wash tape collection.
The little shelf underneath was also from TradeMe and used to be in our playhouse

The wooden shelves are Ikea Spice racks- I bought them from Akia- they are $9 each.  I love these little shelves- I also have one in our ensuite. I was going to paint them before putting them up but I actually like them like this now.

The green wire basket is from TeaPea. I love these baskets and have them in a few places in our home  - the girls have one each above their desks, and I have one in the kitchen for all the artworks/paper that comes home from school /daycare.


The pegboard hooks are from Bunnings- they come in two length so I got a mix of them. I bought some bulldog clips to put on some of the hooks for these cards from Kikki K and Small Acorns- these would be great in kids bedroom to hold their certificates and photos too. Mitre Ten also has a great range of pegboard hooks - more than what Bunnings has from looking on their website... 

The cute fold out ironing board underneath my pegboard is from Wallace Cotton after a friend told me about them being half price in a sale last year. (doesn't look like they have any stock of them at the moment on their website). The spot stickers are 'Abi's dots' from Alex Fulton.


So there you go, some ideas for a pegboard wall of your own!
Thanks for reading and keep an eye out on my Facebook page and Instagram for another DIY coming soon- how to make a chalkboard wall household command centre.... 
Megan x

Related Posts with Thumbnails