Wednesday, August 18, 2010

patchwork

I had my first go at some patchwork in the weekend- a patchwork cushion using some of my reds and pinks fabric scraps ...
and an Elmer cushion from the book "Elmer the patchwork elephant" by David McKee. 
(Elmer's a bit wonky whoops!)
I really like doing patchwork- it's pretty cool to make a whole new fabric from a lot of little scraps!
Megan
PS: If you are an Elmer fan I found some great activities here to go with the book...
http://www.randomhouse.co.uk/childrens/elmer/home.htm

Saturday, August 14, 2010

rainy day kids ideas

I've just started back teaching one day a week and one of the classes I'm teaching is 5 year olds. Their teacher wants me to do lots of 'language experience' activities where we do an activity or listen to a book and then write and draw about it. So I dragged all my old resources out and made a list of ideas and practiced a few on my 3 year old.   I thought I'd share them with you if you're wanting some things to do this rainy weekend! (Both activities use things you've probably got around the house)
Magic Milk
This activity is a great little science one and also good for learning about colours/colour mixing.
You will need
  • full fat milk (full fat seems to work better than trim, also warmer milk seems to work better than milk straight out of the fridge)
  • food colouring- red, blue, yellow and green
  • eye droppers
  • dishwashing liquid (I use Palmolive, a teacher said she used the cheap pink stuff and it didn't work that well)
  • saucer
1. Pour milk into saucer
2. Put a drop of each food colouring into the saucer (top, bottom, left and right like this)
(I used way too much food colouring here, two or three drops is enough!)
3. Squirt a bit of dishwashing liquid into the middle of the saucer
4. Watch what happens (it's pretty cool!)

Magic pictures
The teacher in the 5 year old class I'm in had just done this with the class so it was a good memory jogger for me as I used to like doing this activity with my own classes -it's neat as an intro to print making but is also just a good art activity that can take a little while to do which is always good!!
You'll need
  • A4 paper 
  • chalk (any colour)
  • crayons 
  • sharp pencil
1. Fold the piece of paper in half width ways and cover the inside right side with chalk quite thickly
2. Now cover the chalk with crayon; again the thicker the better (no gaps ). You can just cover the chalk in one colour, do stripes like mine horizontally or vertically, thick zig zag lines, anything really as long as the crayon completely covers the chalk.
3. Fold the piece of paper back over like a card, draw on the front of the 'card' with the sharp pencil. Colour in some of the pictures with the pencil to see what happens when you open the card (like my heart and the birds wing)
You could get them to write their name too- kids love seeing their name backwards!
4. Open up the card and see how the picture has lifted from the right side and made a print onto the left side!
Have fun!
Megan

Thursday, August 12, 2010

my creative space

In my creative space today... I am loving my new sewing calendar that I was lucky enough to win from Melissa's giveaway at 'Tinyhappy'- so many great projects and they even come with templates too. There's a couple of projects that will be perfect for my christmas napkins.
I am also loving my cute- as paper bags that Bee from Purrsie sent me the other day- aren't they sweet. They are from a cool Japanese shop in Auckland. Thank you so much Bee!
And I am admiring this 'Amelie' rain cape from Juliette Hogan that I spotted in last week's Viva. I wouldn't mind it raining if I had this to wear around!
You can take a peek at some more creative spaces at Kirsty's here
Megan

Monday, August 9, 2010

More christmas embroidery

Thank you for your lovely comments about my embroidered napkins- I finished the rest of them in the weekend so here they are...
I have uploaded the individual photo's to my flickr page so you can see what stitches I used. 
And if you are wanting my (very basic) pdf of the designs here's the link again
Megan 

Thursday, August 5, 2010

my creative space: christmas embroidery

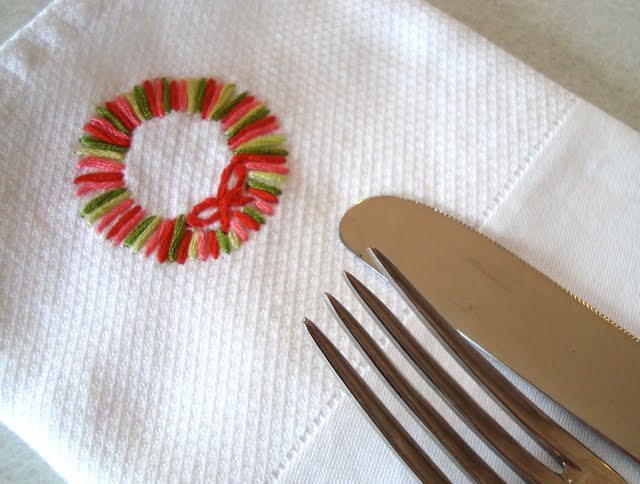
I know it's only August and you really don't want to see Christmas things already but this little project is such a nice one to do on a winters evening that I thought I'd share it now. I thought it was going to be a project that would take me quite a while but I actually did these six napkins in one evening as they really are quite quick to stitch.  I saw the idea to embroider christmas napkins on one of my favourite programmes last year, 'Kirstie's Homemade Christmas', on the Living Channel.  I love the idea of getting out the christmas napkins every year as a little tradition and my girls hopefully treasuring them one day as a sort of family heirloom.
I found the napkins in Briscoes on special for $2 each which was great- they are really good quality too. Or you could make your own or hunt for a set at an op-shop even.  I drew the designs myself after looking through my christmas crafty file, christmas craft books and looking at clipart to get ideas.
So if you would like to make your own christmas napkins here's what you need..
  • white cloth napkins
  • an embroidery hoop- I used a 15 cm one
  • an air vanishing pen
  • embroidery thread in chosen colours- I used the same 5 colours (red, pink, green, light green, yellow and  beige) for all the designs which gives a nice look of unity to the napkins.
  • embroidery needle
  • scissors
  • christmas designs ( if you want to use mine I've made a pdf of them for you- they are pretty basic as I just drew them on paper and scanned them in as I can't draw on the computer!) 

I chose to stitch my designs in the centre top of each napkin so when they're folded the design will be at the top but you could put the design wherever you want.
Either draw the designs straight onto the napkin or trace them by putting sticking the designs on a window and tracing the design onto the napkin.
Stitch over the top of the design with your chosen threads. I used back stitch, chain stitch, satin stitch, running stitch and split stitch for my designs. There are instructions for these stitches here. The individual photo's of each design are on my flickr page
One issue I have is the slight mess at the back of my work so I'm going to iron a bit of interfacing over it to sort of hide it!! If you are a much neater embroiderer than me you probably won't have to though!


Some other ideas....
* these designs would be great for embroidering christmas stockings or decorations or any other christmassy things
* you could even embroider the name of each member of your family on a napkin and every year they have their own napkin- this would also make a great gift for your mother/mother in law if your whole family is going to their house for christmas!
*you could also make these for a house warming, engagement or wedding present embroidered with things like a heart, the couple's initials, a little house picture, a key,  engagement/wedding date,  a plant or flower, a cat or dog if they have pets or any other meaningful pictures for the couple.
* Other christmas motif ideas... Father Christmas, a christmas pudding, a reindeer,  a gingerbread house or gingerbread man...
This one's my favourite :)
Happy stitching!
Check out more creative spaces at Kirsty's here
Megan 

Thursday, July 29, 2010

my creative space: a starfish softie

Just a quick creative space today...I got a request for a soft toy starfish the other day so I used one of the girls stick-on bath toys for the design and made it up last night. I like his cheeky smile :)
For more creative spaces head to Kirsty's  here

Megan 

Monday, July 26, 2010

I ♥ Miffy

I found some great bargains at the second- hand babies and kids shop "Zero to Five" the other day so I thought I'd share them with you. I went in there with my sister in law  and just as we were leaving I spotted this adorable Miffy bag. I love Miffy books and toys-just the other day I found some Miffy books in the same shop so I sent one to Angela for the Vintage Baby swap and kept the other one for the girls.
Anyway, back to the bag- can you believe it was only $3.40 and it's so cool- it has opening windows and doors, some rattle and squeaker toys, its own little washing line (cute!!!) and even a little mirror and a fluffy cloud.


Don't you love it when you find something like that for such a great price!
I also found this when I got the books the other day-  a pencil case type thing full to the brim with crayons for $4.20 so I had to get that too. 
Once they've all worn down a bit I'd like to have a go at making these from Cat Taylor's blog.

If you're a Dick Bruna fan you might like to check out Maika Creation's blog. Caroline is recreating a Dick Bruna alphabet frieze in fabric and every week she posts a new letter- check out her creations here.

And this Miffy website is really cute for the kids in your house...

I've started a little list of "Cool Kids websites" down the side of my blog-if you've got any sites that your kids love to visit let me know and I'll add them. So far I've just got got the Miffy one, www.haringkids.com and www.bemboszoo.com. I especially like sites linked to authors or illustrators/artists but any links would be great :) 
Head over to here to see more thrifty finds...
Megan 

Tuesday, July 6, 2010

'ballet girls' satchel bag

I made this satchel bag for a little girl who loves ballet and goes to lots of ballet competitions. Her mum wanted a bag that could fit her ballet shoes and cardi in so I thought the satchel bag tutorial from Heleen at Ruby in the Dust would be perfect. I made a couple of these a while ago (here and here) but finally got around to learning how to put the straps in properly instead of just sewing them on afterwards- looks much more professional!


I made a matching toilet bag too as her mum said she needed a little bag to put all her make-up and hair accessories for the ballet competitions in.  Can't wait to make more of the satchel bags now!
I had some of the ballet fabric left over so I made a couple of cushion covers for Amelie's room.
And if you know a little ballet fan I made a ballet girls zip purse for my Felt shop too.
Well, I am thinking about getting a walking foot for my sewing machine-I'm sewing four layers together when I sew these purses so I bet once I use the walking foot I will wonder why I didn't get one earlier??!! Are they easy to use? I'm thinking it will come in handy for little baby quilts, oven gloves and other things that need layers of fabric sewn together as well. Just wondering if it would work all right with the plastic outer?  Any advice much appreciated!
Megan x

Thursday, July 1, 2010

my creative space: personalised pillowcases

I've finally managed to list my personalised pillowcases in my Felt shop yay!
I chose these fabrics for girls and boys ones...
It's been a busy week of sewing, looking after two little ones and dealing with a house full of colds. Some times I find it really hard to get the balance right as when I am on a crafting mission I go a bit crazy staying up really late and trying to finish things to a deadline I make for myself. (Does that sound familiar?!) I still love it though - creating things and thinking about crafty projects is so much fun, even if some weeks it's a bit challenging to get the time!
To see what other crafty ladies are up to today visit Kirsty's here.
Megan x
Related Posts with Thumbnails